A Life of Fantasy
By Pat Corbett
In recent years fantasy has grown in popularity and elves, pixies, and fairies have once again entered our lives and our hearts. It's not just children who have been drawn into magical realms but adults as well. There are few of the fairer sex who didn't fall in love with Orlando Bloom's Legolas of the Woodland Elves, and what little girl doesn't want to grow up to be the beautiful Galadriel? Tinkerbell has been part of every child's life and the beautiful images of fantasy creatures created by Brian Froud have long been loved by all. Perhaps we can't be those characters, but as reborn artists we can give birth to our fantasies. We can create our own private magical creatures and hold them in our arms and share them with the world.
Luckily for reborn artists, novice or expert, Australia's Kirsty Black has generously shared her secret for re-sculpting dolls to begin the process of turning our babies into magical creatures.
Kirsty Black's Fairy Ears
List of Materials:
Secrist Doll Kit of your choice
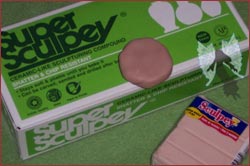
Sculpey or polymer clay of your choice in flesh color
Basic sculpting tools or "make-do" tools
Cookie sheet and clean dishtowel or a wire cooling rack
Oven. You can use simple items you already have to take the place of formal tools. Kirsty says that a crochet hook does well to shape clay into the ears, and I have discovered that the end of a paintbrush will also do the job quite nicely. You can use a pasta machine to roll clay; I actually used an empty aspirin bottle for the small amount of clay needed here. Cutting is easily accomplished with a heavy plastic knife or a craft knife. Plastic clay tools are very inexpensive so you decide what works for you. As a rule of thumb, use whatever does the job for you but once you use something to sculpt polymer clay with put it aside and only use it for that purpose, not near food.
Before beginning your re-sculpt make sure to wash your hands to remove any oils that might interfere with your sculpting. Wash your doll's head in hot water to remove any impurities. Once head is fully dry you will be ready to sculpt your ears. Whatever you do, don't be discouraged if your first try is not successful. Nothing is permanent until it has been baked in the oven. If you don't like your first results just pull the clay away from your doll's head and start over! I managed to hold back my tears when I messed up the first pair of ears.
Step One:
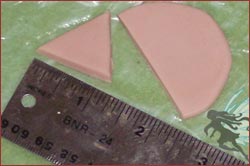
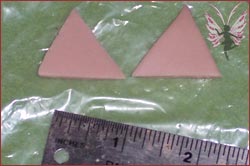
Take a hunk of clay a little larger then you think you will need to make your ears and soften it in your hands or with a pasta machine. Clay can be rolled on any clean non-porous surface. I used a piece of plastic that I tossed out when I was done. Roll the clay to a thickness of approximately 1/4 of an inch. Cut two triangles of equal size from your clay. These will be your ears. Make sure that the bottom of your triangle is just longer then the width of your doll's ear.
Step Two:
Use your fingers and your "tools" to smooth the bottom of the triangle to the top of your doll's ear. Make sure to smooth the clay into the ear and around the back of the ear near the head. With this step you are attaching your ear to the original sculpt so you want to make sure to get a smooth edge between the original and your addition so that the new ear transitions smoothly into the original ear.
Step Three:
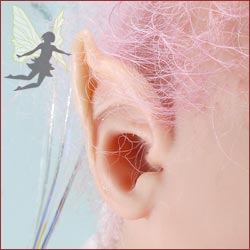
Once your triangle is secured to the original begin shaping the upper point of your triangle into the pointy or frilled ear that your fairy will have. Although this is perhaps the trickiest part of the process, practice will make perfect. Use your tools to help create the nice rounded edge of the ear and any depressions that you want to highlight. You may find that working on both ears at once, switching back and forth from side to side will help you to keep the ears balanced. No two ears will ever be exactly the same, or ever have been, but we don't want our fairy to be lopsided. I had to try this a few times before I got an "acceptable" ear.
Step Four:
Now it's time to make your doll's new ears permanent. Kirsty puts a clean dishtowel on a cookie sheet and then places her re-sculpted head onto the towel and then into the oven. I get nervous putting anything in the oven that likes to catch fire so I used a cooling rack like I put my pies on when they come out of the oven. You might also choose to use parchment paper instead of a towel. Choose your weapon, place your doll's head onto it and place it into a cold oven. Turn your oven on and allow it to reach the manufacturer's suggested curing temperature and bake the head for approximately 15 to 20 minutes or whatever the manufacturer suggests. Once the head has been heated for the necessary time, turn the oven off and allow it to cool to room temperature. Heating or cooling the new sculpt too quickly could result in cracking so patience is very important here. Because of the high quality of the eyes used in Secrist dolls you do not need to worry about them during the process of curing the clay in the oven.
Once your doll's head is cooled you can reborn your baby just as you would with any other doll. Because you have extended the tips of your ears you might want to take care when you root your doll's hair not to put undue pressure on them.
You now have a sweet and magical creature in your arms and I can see the smile on your face from here, and I'm smiling too. With great thanks to Kirsty Black we can now put sweet little curly ears on our babies and turn them into elves, hobbits, or whatever we want.